DIY copper picture frame modelling
Introduction
Copper modelling, as must be known by a great number of the readers of The House, is a simple form of metal work, by means of which hammers, punches, and other requisites of ordinary repoussé are rendered unnecessary. Sheets of copper are obtained, and on these the design is marked; the embossing is then put in from the back, and the modelling from the front, with any small round point. An agate style or simple pencil will do admirably for this purpose. The weakness of the work is, of course, in the extreme tenuity of the material, and in executing large pieces some experience and care is required.
It is for the purpose of brightening up and furbishing, so to speak, other pieces of decorative work that copper modelling is most useful. The little pieces of metal are very cheap and very easy to emboss, and may be filled at the back with a little beeswax or plaster, and will wear hard. In some cases, indeed, they may be merely stuck on with some adhesive like seccotine. In others, tiny brads suffice.
Making your own copper corners for picture frames, boxes, and other household items has several advantages. Firstly, it allows you to add a personal touch to your decor and make it unique. Secondly, creating your own copper corners can be a fun and rewarding DIY project that can save you money compared to buying pre-made decor. Thirdly, copper is a durable and versatile material that can add a touch of elegance and sophistication to any object. Finally, by creating your own copper corners, you have the flexibility to customize the size, shape, and design to fit your specific needs and preferences.
Materials Needed
To create decoratively embossed copper corners, you will need some essential tools and materials. These include:
- Copper sheets: Copper sheets are the primary material required for creating embossed copper corners. You can purchase copper sheets from a craft store or an online retailer.
- Embossing tools: Embossing tools are necessary for creating intricate designs on the copper sheets. These tools come in different shapes and sizes, and you can find them at any craft store.
- Cutting tools: Cutting tools, such as scissors or a craft knife, are required to cut the copper sheets into the desired size and shape.
- Sandpaper: Sandpaper is used to smooth out the edges of the copper sheets after cutting.
- Adhesive: You will need adhesive to attach the copper corners to the picture frames, boxes, or other household items.
- Protective gear: Working with copper sheets can be dangerous, so it is essential to wear protective gear such as gloves and eye protection.
With these tools and materials, you can create beautiful, personalized decoratively embossed copper corners for your picture frames, boxes, and other household items.
Embossing Designs
During the Victorian era arts and crafts movement, embossed metalwork was popularly used for decorative purposes. The designs featured intricate and ornate patterns, with a heavy emphasis on nature-inspired motifs such as leaves, flowers, and birds. The metal sheets were often hammered or pressed to create a relief effect, and then chased or engraved to add further detail and depth. The final product was typically polished or given a patina to enhance the intricate design and provide an elegant finish. These decorative designs were used to adorn a variety of objects, from picture frames and jewelry boxes to lamps and furniture.
An example of a typical Arts and Crafts pattern that may be used for embossing is the acanthus leaf. This leaf pattern is inspired by ancient Greek and Roman art and is characterized by its stylized leaves with deep veins and curling edges. It has a strong and organic shape that lends itself well to the embossing process. Another common Arts and Crafts pattern is the quatrefoil, a symmetrical shape with four lobes that often features intricate detailing and curves. The use of geometric shapes, floral motifs, and repetitive patterns is also common in Arts and Crafts designs.
Construction Technique
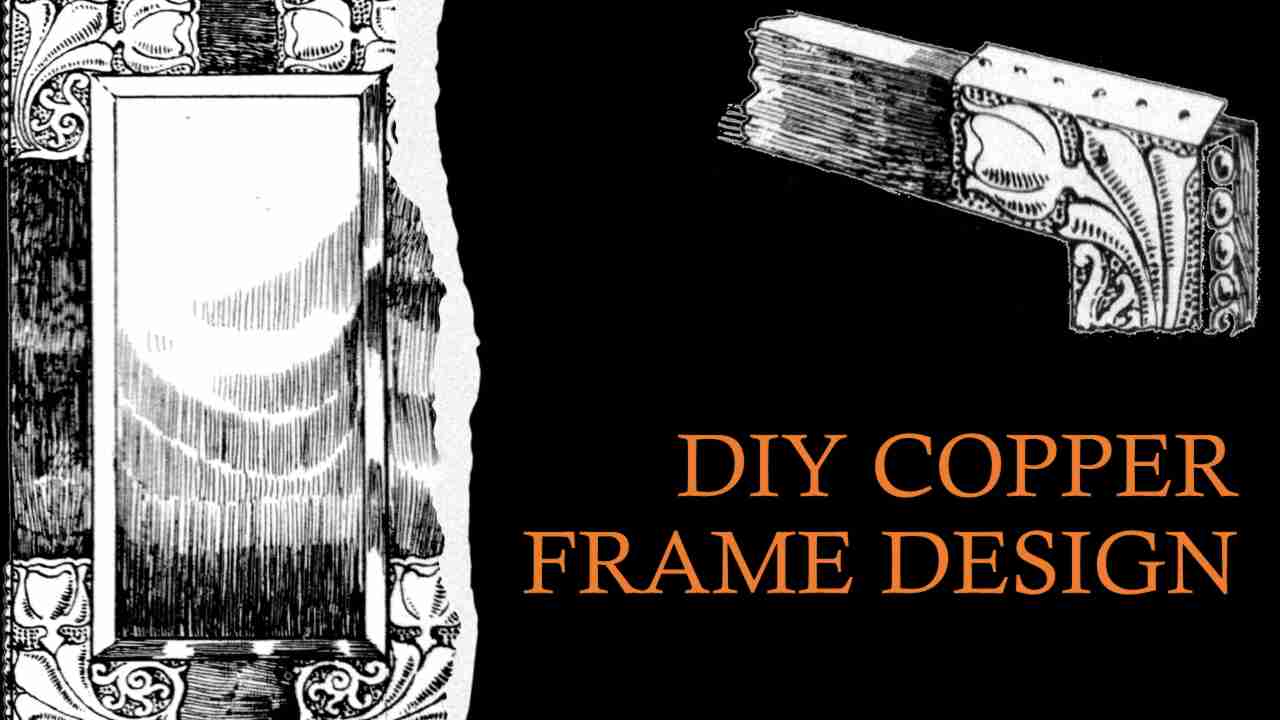
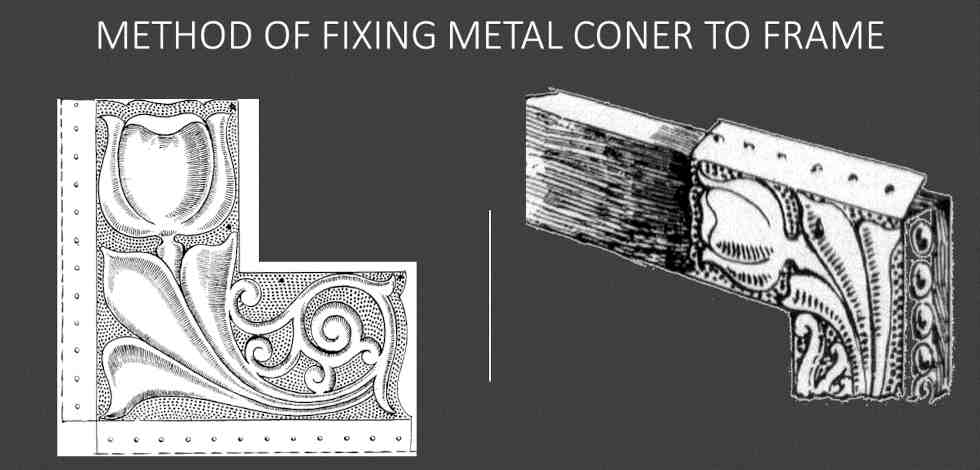
The design given is for a small frame, and the woodwork is comparatively plain, being set off by pieces of modelled copper. The full-size working drawings supplied should be traced, if possible on to linen tracing paper. When all the various parts are so copied, the tracing paper should be pinned over a sheet of copper, and the style or point used to impress lightly in outline the design on the metal. All the pieces may be put on one sheet, and the latter subsequently cut out as required. It would be better to do the cutting out before any attempt at modelling is made, as working on one part is likely to destroy what has been done on another. The work is done on a pad consisting of three or four sheets of blotting paper. When the edges are prepared to be fastened and everything is ready and the metal is wanned, a little melting wax may be poured in.
The piece is then placed with a piece of card or wood over it, so as to smooth over the wax. When all this is cold, the ornament is ready to be applied. Pewter foil or thin brass may be used in place of copper. In answer to several inquiries, I may say that these metals and other requisites for the work may be obtained from Mr. Pringuer, whose address will be found in the advertisement pages.
Tips and Tricks
Here are some tips and tricks for creating an authentic decoratively embossed copper corner:
- Plan your design: Before beginning your project, it is essential to have a plan of the design you wish to create. You can sketch your design on paper or use a computer-aided design program to map out your design.
- Choose your copper sheet: Copper sheets come in different sizes and thicknesses. Choose a size that fits your project and the thickness that is suitable for the embossing you intend to do.
- Use a tracing paper: A tracing paper can help transfer your design to the copper sheet. Place the tracing paper on the copper sheet and trace the design using a stylus or a pencil.
- Emboss the design: Once the design is traced on the copper sheet, place the copper sheet on a soft surface and use a metal embossing tool to create the design by applying pressure from the back of the copper sheet.
- Cut out the corners: After embossing the design, cut out the corners using a metal snip. Be sure to leave a small border around the edges of the design.
- Sand the edges: Use a fine-grit sandpaper to smooth out the edges of the copper corner. This will remove any rough spots or sharp edges that could damage the picture or box.
- Attach the corners: Once the corners are cut out and sanded, use a strong adhesive to attach them to the picture frame or box. Be sure to align them correctly.
- Decorate the frame: You can paint or stain the frame to complement the copper corners. Use colors that will highlight the copper design or create a contrasting effect.
By following these tips and tricks, you can create an authentic decoratively embossed copper corner for your picture frame or box.
Conclusion
A fun fact about copper embossing is that it is a traditional craft that has been practiced for thousands of years, with examples of embossed copperwork dating back to ancient civilizations like the Egyptians and Greeks. In fact, the iconic Statue of Liberty in New York City is made of copper and features intricate embossed details on its surface.
Creating a decoratively embossed copper corner for a picture frame or other household item can be a fun and rewarding project. With the right tools, materials, and techniques, it is possible to create a unique piece of home decor that reflects your personal style and artistic vision. By incorporating traditional arts & crafts designs or experimenting with your own ideas, you can create a stunning copper picture frame that is sure to be a conversation piece. So why not give it a try and unleash your creativity? The possibilities are endless!
Technical Tutor.
☆ ☆ ☆ ☆ ☆
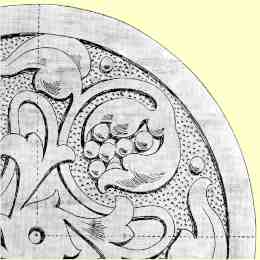
Free decorative picture frame stencil
I've included a PDF sketch of the the floral stencil. You can print this off and sketch your designs onto the copper sheet as a DIY project. This will give you an authentic looking Victorian era picture frame edge.
DOWNLOAD